So the fourth week of the 3D Modelling has not been the smoothest of weeks. Overall a lot has gone wrong and not much has gone right, however, a lot of work has been done.
 |
You will find this schematic on the
Mood Board Also |
Regarding the Decayed Village, i have decided that it is best to work on my Assignment Models as a priority over the task - which itself has proved complex and difficult to know where to begin. Furthermore i have decided the models i am going to use and the order i shall do them.
The models i used were confirmed by my Storyboard, after timing myself playing the animation in my head i have recently been able to get close to 30 Seconds. The Storyboard will be posted as a single Blog Post like this one, this will also be the same for my Mood Board (alongside descriptions of images and translating my poor handwriting for the Storyboard).
 |
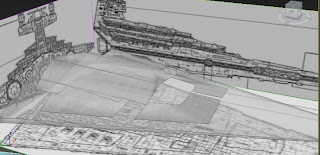
The scaled sizes made the Model
easier to shape inside the planes |
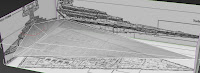
My first Model of choice is the Imperial Star Destroyer i have fondly mentioned beforehand. As it is the largest and the prominent model of my animation i decided that this was the one to do first. Using the references from Star Wars Wiki
Wookieepedia i got schematics for two of my models (as you will see on my Storyboard, the other model that is mandatory to be handed in for the 2nd November does not require a reference) and added them to planes, all of which had to be of equal scale to one another. However, this required some editing on Gimp and the Side View to be stretched only a few pixels longer.
 |
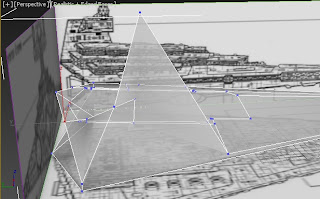
The more i think about it, the more i wonder if the
Pyramid was the most suitable choice |
 |
Inserting Vertices doesn't
have to be on the selected
Line |
For the base of the Ship i decided to use a Pyramid, it's square face would be the diamond area for my Engines to be places - i later discovered that using a cube would prove to be a much easier method. I then decided that to reduce the Polygon count and to increase detail, i will use Vertices by using the 'Add Vertex' tool on the
Edges Selection Pane and remove the edges to get the correct shape. I would later extrude the polygon to the correct scale of the references.
 |
| This happened quite a few times... |
In adding the Vertices however, i found myself reediting points because i had either selected the bottom vertex and not the top or mistakenly altered the z-axis, causing the ship to look wrongly morphed. It later came to my attention that by striving for as little polygons and as much detail as possible, i had gone too far - as it is supposed that all edges are met with 3 or 4 points, compared to my 1 or 2, causing the lines i made to be extruded (seen through by the x-ray method of Alt+x) act like a separate primitive.
As a result, i intend on trying to be less strict with the polygon count and start again on a previous version, i shall also avoid repeating my mistakes on the other models. To justify my mistakes though, i only did it so i could improve my grade - which is not a crime - overall i believe that although there is a balance between polygon efficiency and detail, it is indeed difficult to stay in this balance.
 |
Notice how the middle bit is darker
That's not supposed to happen
Did Not Want, Do Not Want |
This week's exercise was Texturing. As stated with the Derelict Village the exercise may take a sidebar to the Assignment Models, however, some texturing skill is shown in applying the schematic images to the planes. Regarding the exercise, texturing seems simple enough, but being too clever about it can lead to confusion.


No comments:
Post a Comment